Chapter 08 - Making Decisions
The statements inside your source files are generally executed from top to bottom, in the order that they appear. Control flow constructs, however, break up the flow of execution by employing decision making, enabling your program to conditionally execute particular blocks of code. This section describes the decision-making statements if, if-else, and switch supported by the C# programming language.
Conditions
A computer program must often make choices on how to proceed, take for example:
- if the user enters invalid data give him/her a message, otherwise process the data.
- if the ball bounces the edge of the screen, change trajectory, else keep going forward.
- if all the data has been processed, end the program, else continue to the next data item.
- if the player has lives left continue the game, else show a game over screen.
In flowcharts, these decisions are easily identified by the diamond shape with the question inside.

Your application will make a choice based on what is called a condition (a representation of the question as it were). Usually this is in the form of a mathematical expression using equals, less-than, greater-than, different from, ...
A condition is some sort of comparison (or a combination of comparisons) that can be evaluated by the compiler or interpreter. After solving all comparisons and combining all the individual parts, the compiler resolves it to a single resulting value that is true or false (also keywords in C#). These are actually values that the data type bool can take.
🔍 Evaluating a condition
Evaluating a condition is the process of determining the result of that condition. The end result of a condition after the evaluation has taken place is always true or false. The true and false values can differ from language to language, however internally in memory false is most of the time "0" and true is "not 0". Generally spoken one can state that the compiler evaluates the condition to be true or false.
Comparison Operators
Comparison operators allow us to build conditional expressions using mathematical operators. The table below shows the available comparison operators.
| Operator | Description |
|---|---|
== | equal to |
!= | not equal to |
> | greater than |
>= | greater than or equal to |
< | less than |
<= | less than or equal to |
Note how two equality signs == are used to test if two values are equal, while a single sign = is used for assignment. Using a single sign for a comparison is a mistake often made by beginning programmers.
Since a conditional expression actually produces a single true or false result, this result can be assigned to a variable of type bool.
Take a look at the code below, which contains some examples of comparison operations:
int a = 4;
int b = 8;
bool result;
result = (a < b);   // true
result = (a > b);   // false
result = (a <= 4);  // a smaller or equal to 4 - true
result = (b >= 9);  // b bigger or equal to 9 - false
result = (a == b);  // a equal to b - false
result = (a != b);  // a is not equal to b - true
The parentheses are optional here but are used to make the code more clear.
While the comparison operators will not often be used in a situation as shown in the code above, they will often be used when making decisions in your program.
The if statement
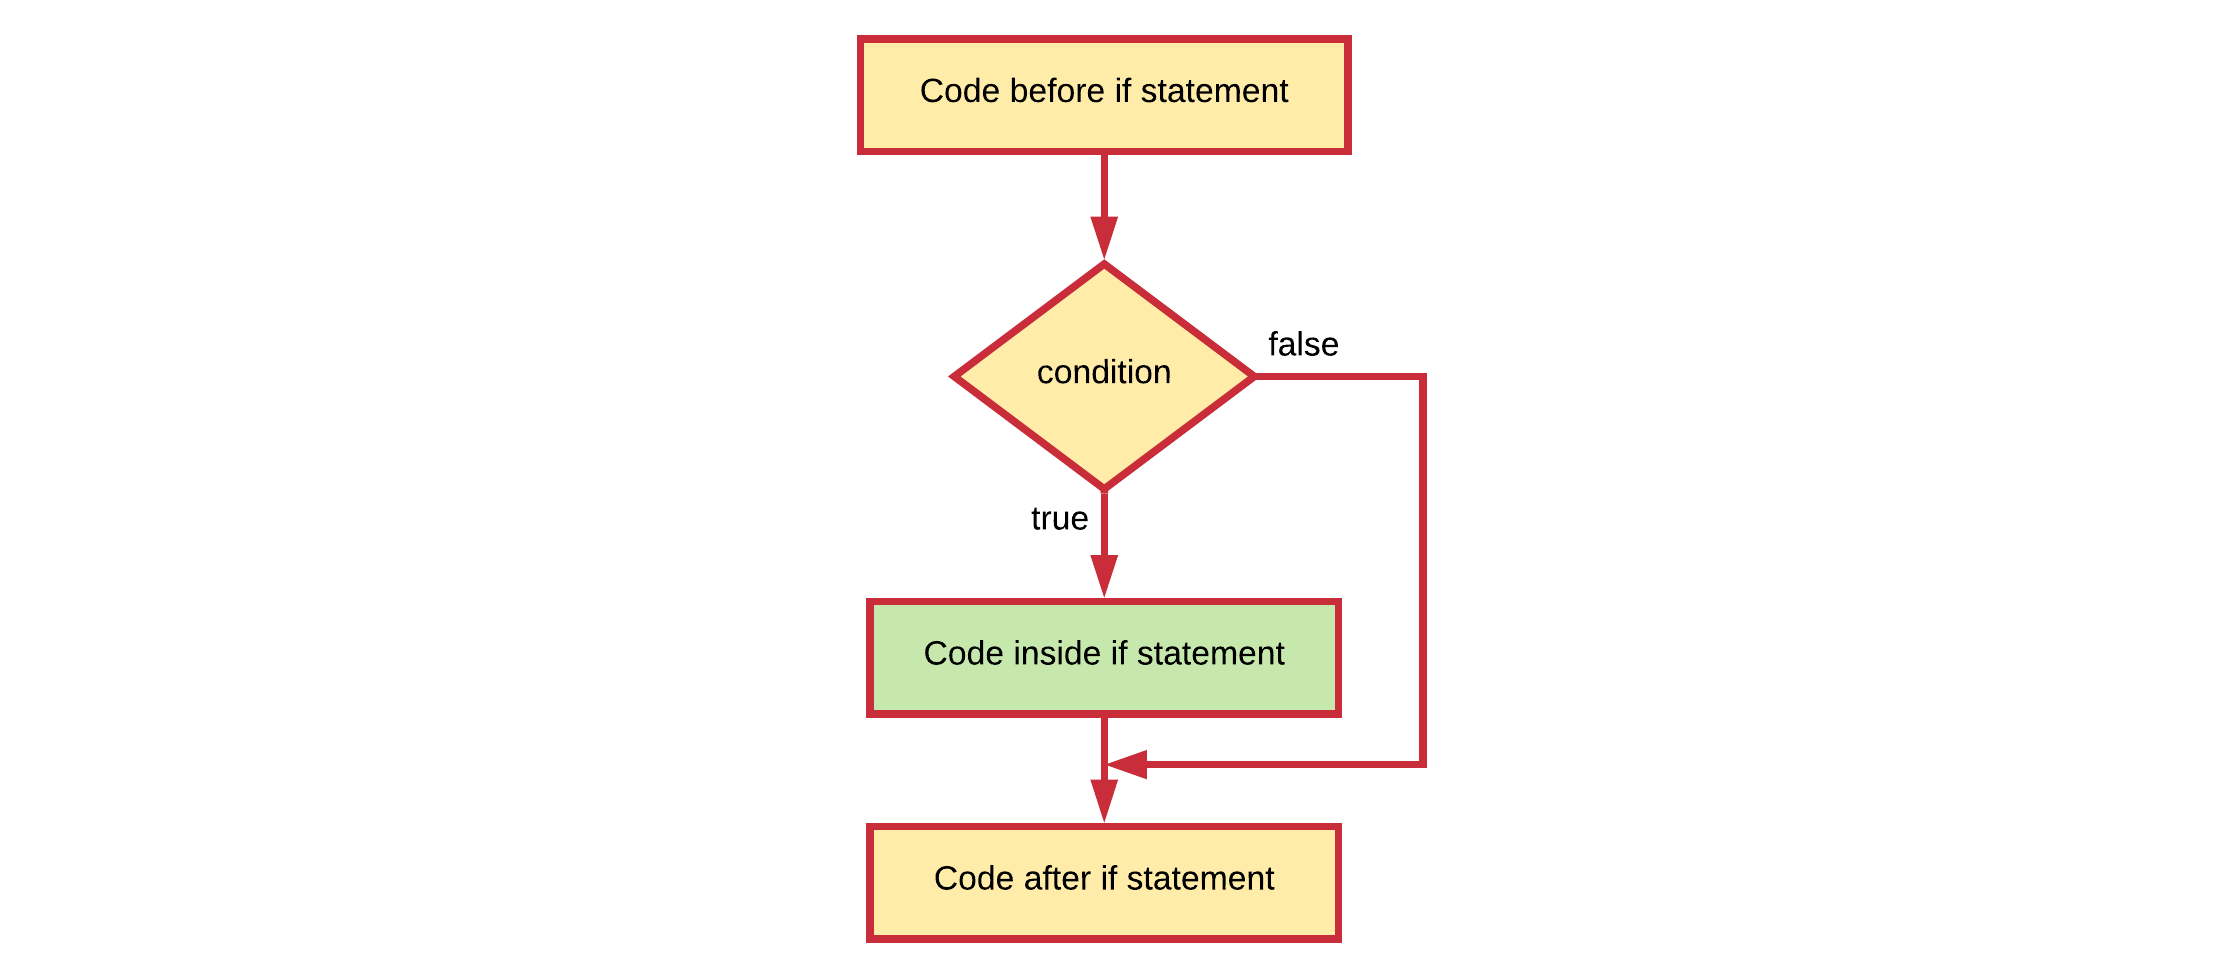
The if statement is the most basic of all the control flow statements. It tells your program to execute a certain section of code only if a particular condition evaluates to true. If the condition evaluates to false the execution jumps to the code after the if statement.
The general syntax of an if statement is:
// Code before the if statement

if (condition) {
  // Code inside if statement
  // Executed when condition evaluates to true
}

// Code after the if statement
This can be visually represented using the next flowchart.

Take a simple example that tests if the score of the student is below 70%. If that is the case, an encouraging speech is outputted to the terminal.
int studentScore = 30;      // Change this number to test the if statement
//...
Console.WriteLine("Your score is " + studentScore + "%");
if (studentScore < 70)
{
  Console.WriteLine("Come on buddy, you will need to work a little harder.");
  Console.WriteLine("You can do it. Still got some time till the exams.");
}
Output
Your score is 30%
Come on buddy, you will need to work a little harder.
You can do it. Still got some time till the exams.
If the condition evaluates to false (meaning that the score is equal or above 70), control jumps to the end of the if statement.
When the code block consists of only a single line of code, the curly brackets {} can be left out. However, for code readability reasons it is strongly advice against it.
int studentScore = 30;      // Change this number to test the if statement
//...
Console.WriteLine("Your score is " + studentScore + "%");
if (studentScore >= 70)
  Console.WriteLine("Good job. Keep at it");
The if-else statement
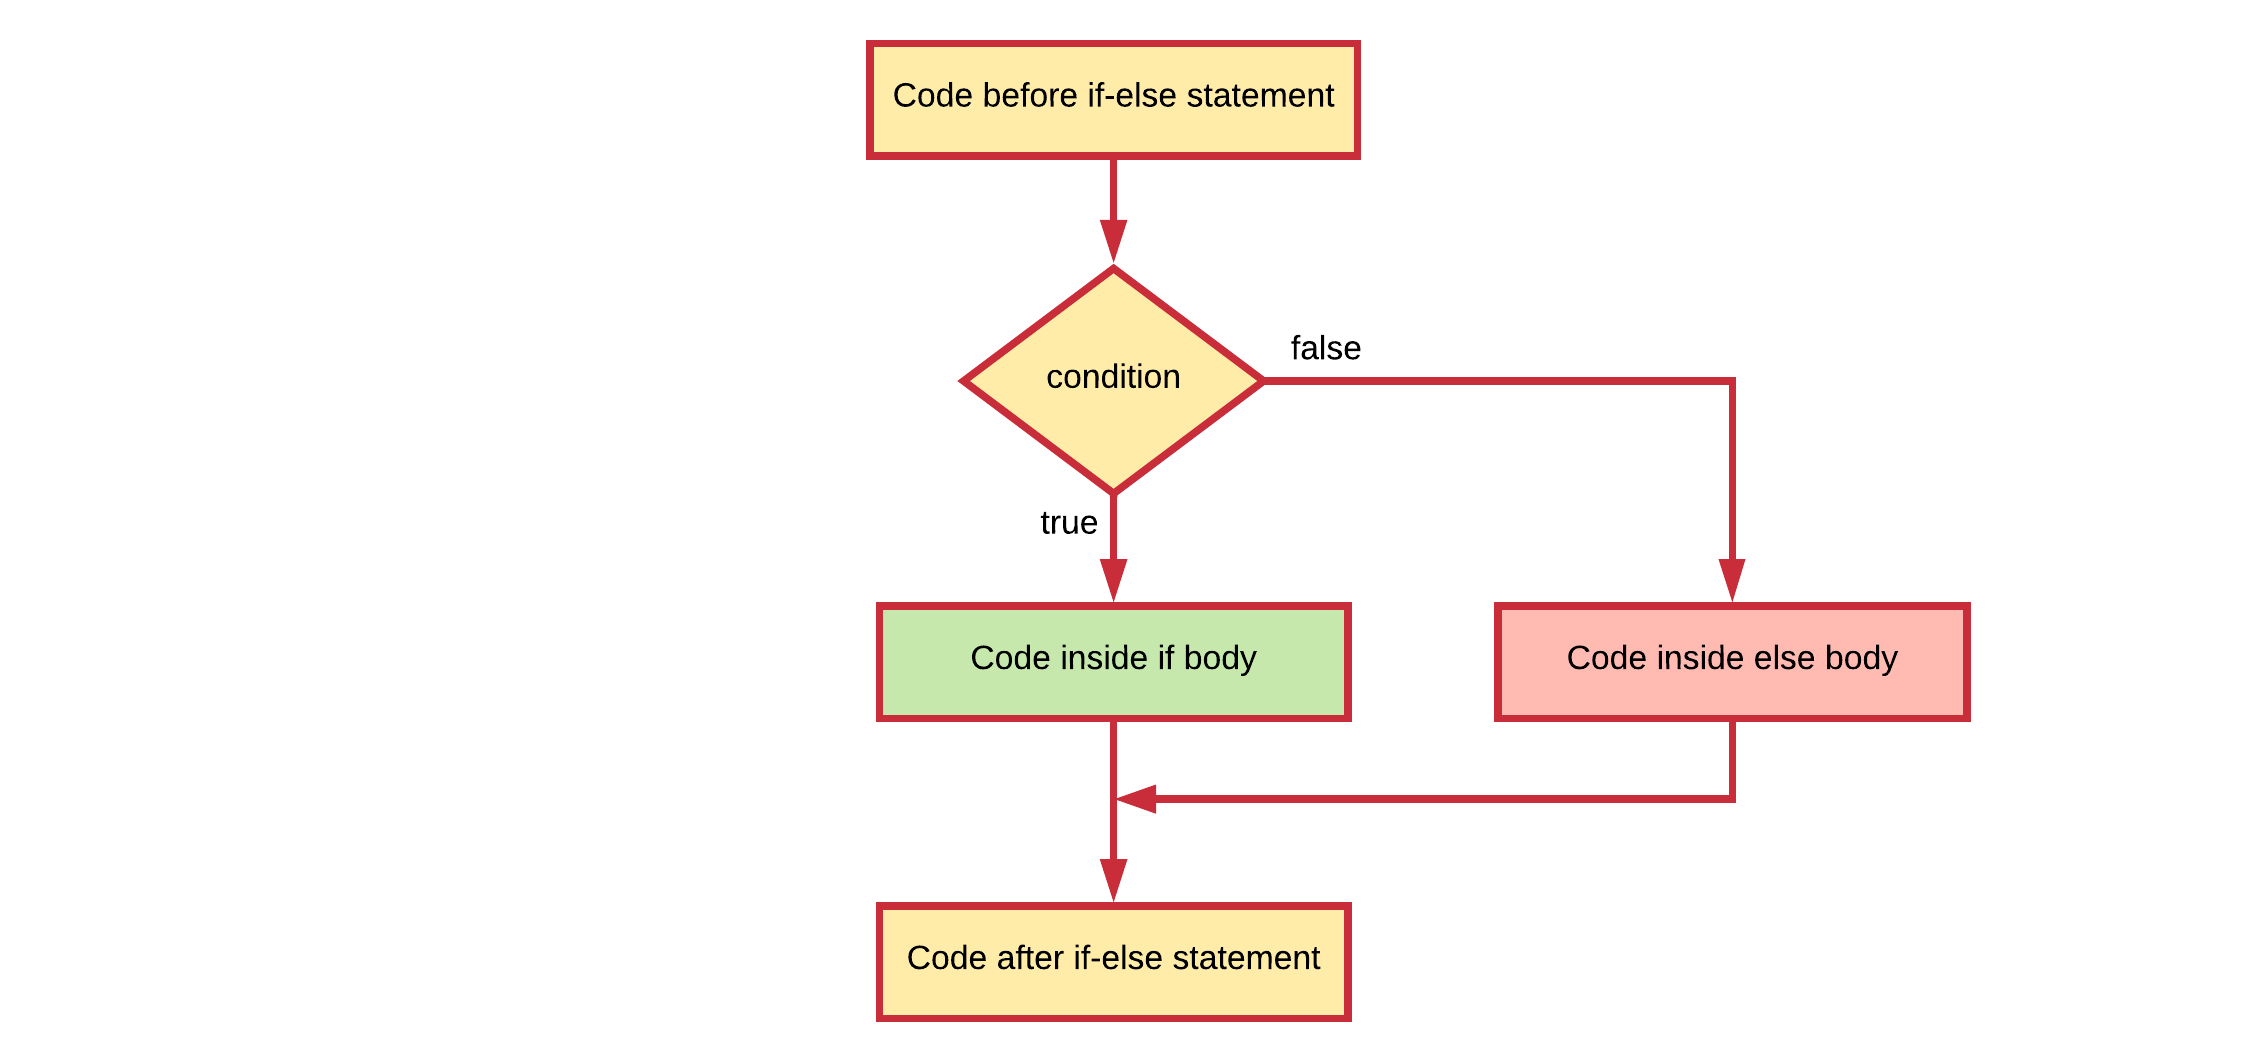
The if-else statement provides a secondary path of execution when the if clause evaluates to false. This basically means that in the true case something will happen and in false case something else will happen.
The general syntax of an if-else statement is:
// Code before the if-else statement

if (condition) {
    // Code inside if body
    // Executed when condition evaluates to true
} else {
    // Code inside else body
    // Executed when condition evaluates to false
}

// Code after the if-else statement
This can be visually represented using the next flowchart.

Taking the previous example you could output a "good job" speech when the students score is equal or above 70%.
int studentScore = 85;      // Change this number to test the if-else statement
//...
Console.WriteLine("Your score is " + studentScore + "%");
if (studentScore < 70)
{
  Console.WriteLine("Come on buddy, you will need to work a little harder.");
  Console.WriteLine("You can do it. Still got some time till the exams.");
}
else
{
  Console.WriteLine("Good job. Keep up the good work.");
}
Output
Your score is 85%
Good job. Keep up the good work.
Nesting if-else statements
It is perfectly legal to nest if-else structures inside of each other. Take for example the code below where the message to the user is a bit more personalized based on the gender of the student.
int studentScore = 30;      // Change this number to test the if-else statement
char gender = 'f';          // Change the gender to 'm' for male and 'f' for female
                            //...
Console.WriteLine("Your score is " + studentScore + "%");
if (studentScore < 70)
{
  if (gender == 'm')
  {
    Console.WriteLine("Come on buddy, you will need to work a little harder.");
  }
  else
  {
    Console.WriteLine("Come on miss, you will need to work a little harder.");
  }
  Console.WriteLine("You can do it. Still got some time till the exams.");
}
else
{
  Console.WriteLine("Good job. Keep up the good work.");
}
Output
Your score is 30%
Come on miss, you will need to work a little harder.
You can do it. Still got some time till the exams.
A nested if-else construct can also be used to create multiple branches (paths of execution) based on different conditions. Take for example the code below that display a more user-friendly message to the student.
int studentScore = 30;    // Change this number to test the if-else statement
                          //...

// Example of a multi-branch if-else statement
if (studentScore >= 90)
{
  Console.WriteLine("Omg, good job. Keep up the work.");
}
else
{
  if (studentScore >= 70)
  {
    Console.WriteLine("Some room for improvement but you are on your way.");
  }
  else
  {
    if (studentScore >= 50)
    {
      Console.WriteLine("Ok. But you may want to considering studying a bit more.");
    }
    else
    {
      if (studentScore >= 30)
      {
        Console.WriteLine("Come on buddy, you will need to work a little harder.");
      }
      else
      {
        Console.WriteLine("You may want to cancel your vacation for studying.");
      }
    }
  }
}
The previous code is not very clear and hard to read. However, the code can be changed a bit making it much more maintainable and readable. When the body of the branch consists of a single line of code, the curly brackets are optional. Now in many programming languages the whole if-else construct is considered a single statement - an if-else statement.
Now if one were to remove the curly brackets from the else-clauses (except for the last one) this would imply that the previous code can be rewritten as:
int studentScore = 30;      // Change this number to test the if-else statement
                              //...
Console.WriteLine("Your score is " + studentScore + "%");
if (studentScore >= 90)
{
  Console.WriteLine("Omg, good job. Keep up the work.");
}
else if (studentScore >= 70)
{
  Console.WriteLine("Some room for improvement but you are on your way.");
}
else if (studentScore >= 50)
{
  Console.WriteLine("Ok. But you may want to considering studying a bit more.");
}
else if (studentScore >= 30)
{
  Console.WriteLine("Come on buddy, you will need to work a little harder.");
}
else
{
  Console.WriteLine("You may want to cancel your vacation for studying.");
}
This is perfectly legal and is common-practice among developers. The above construct is actually referred to as an if-elseif-else construct and is a special form of nested if-else statements.
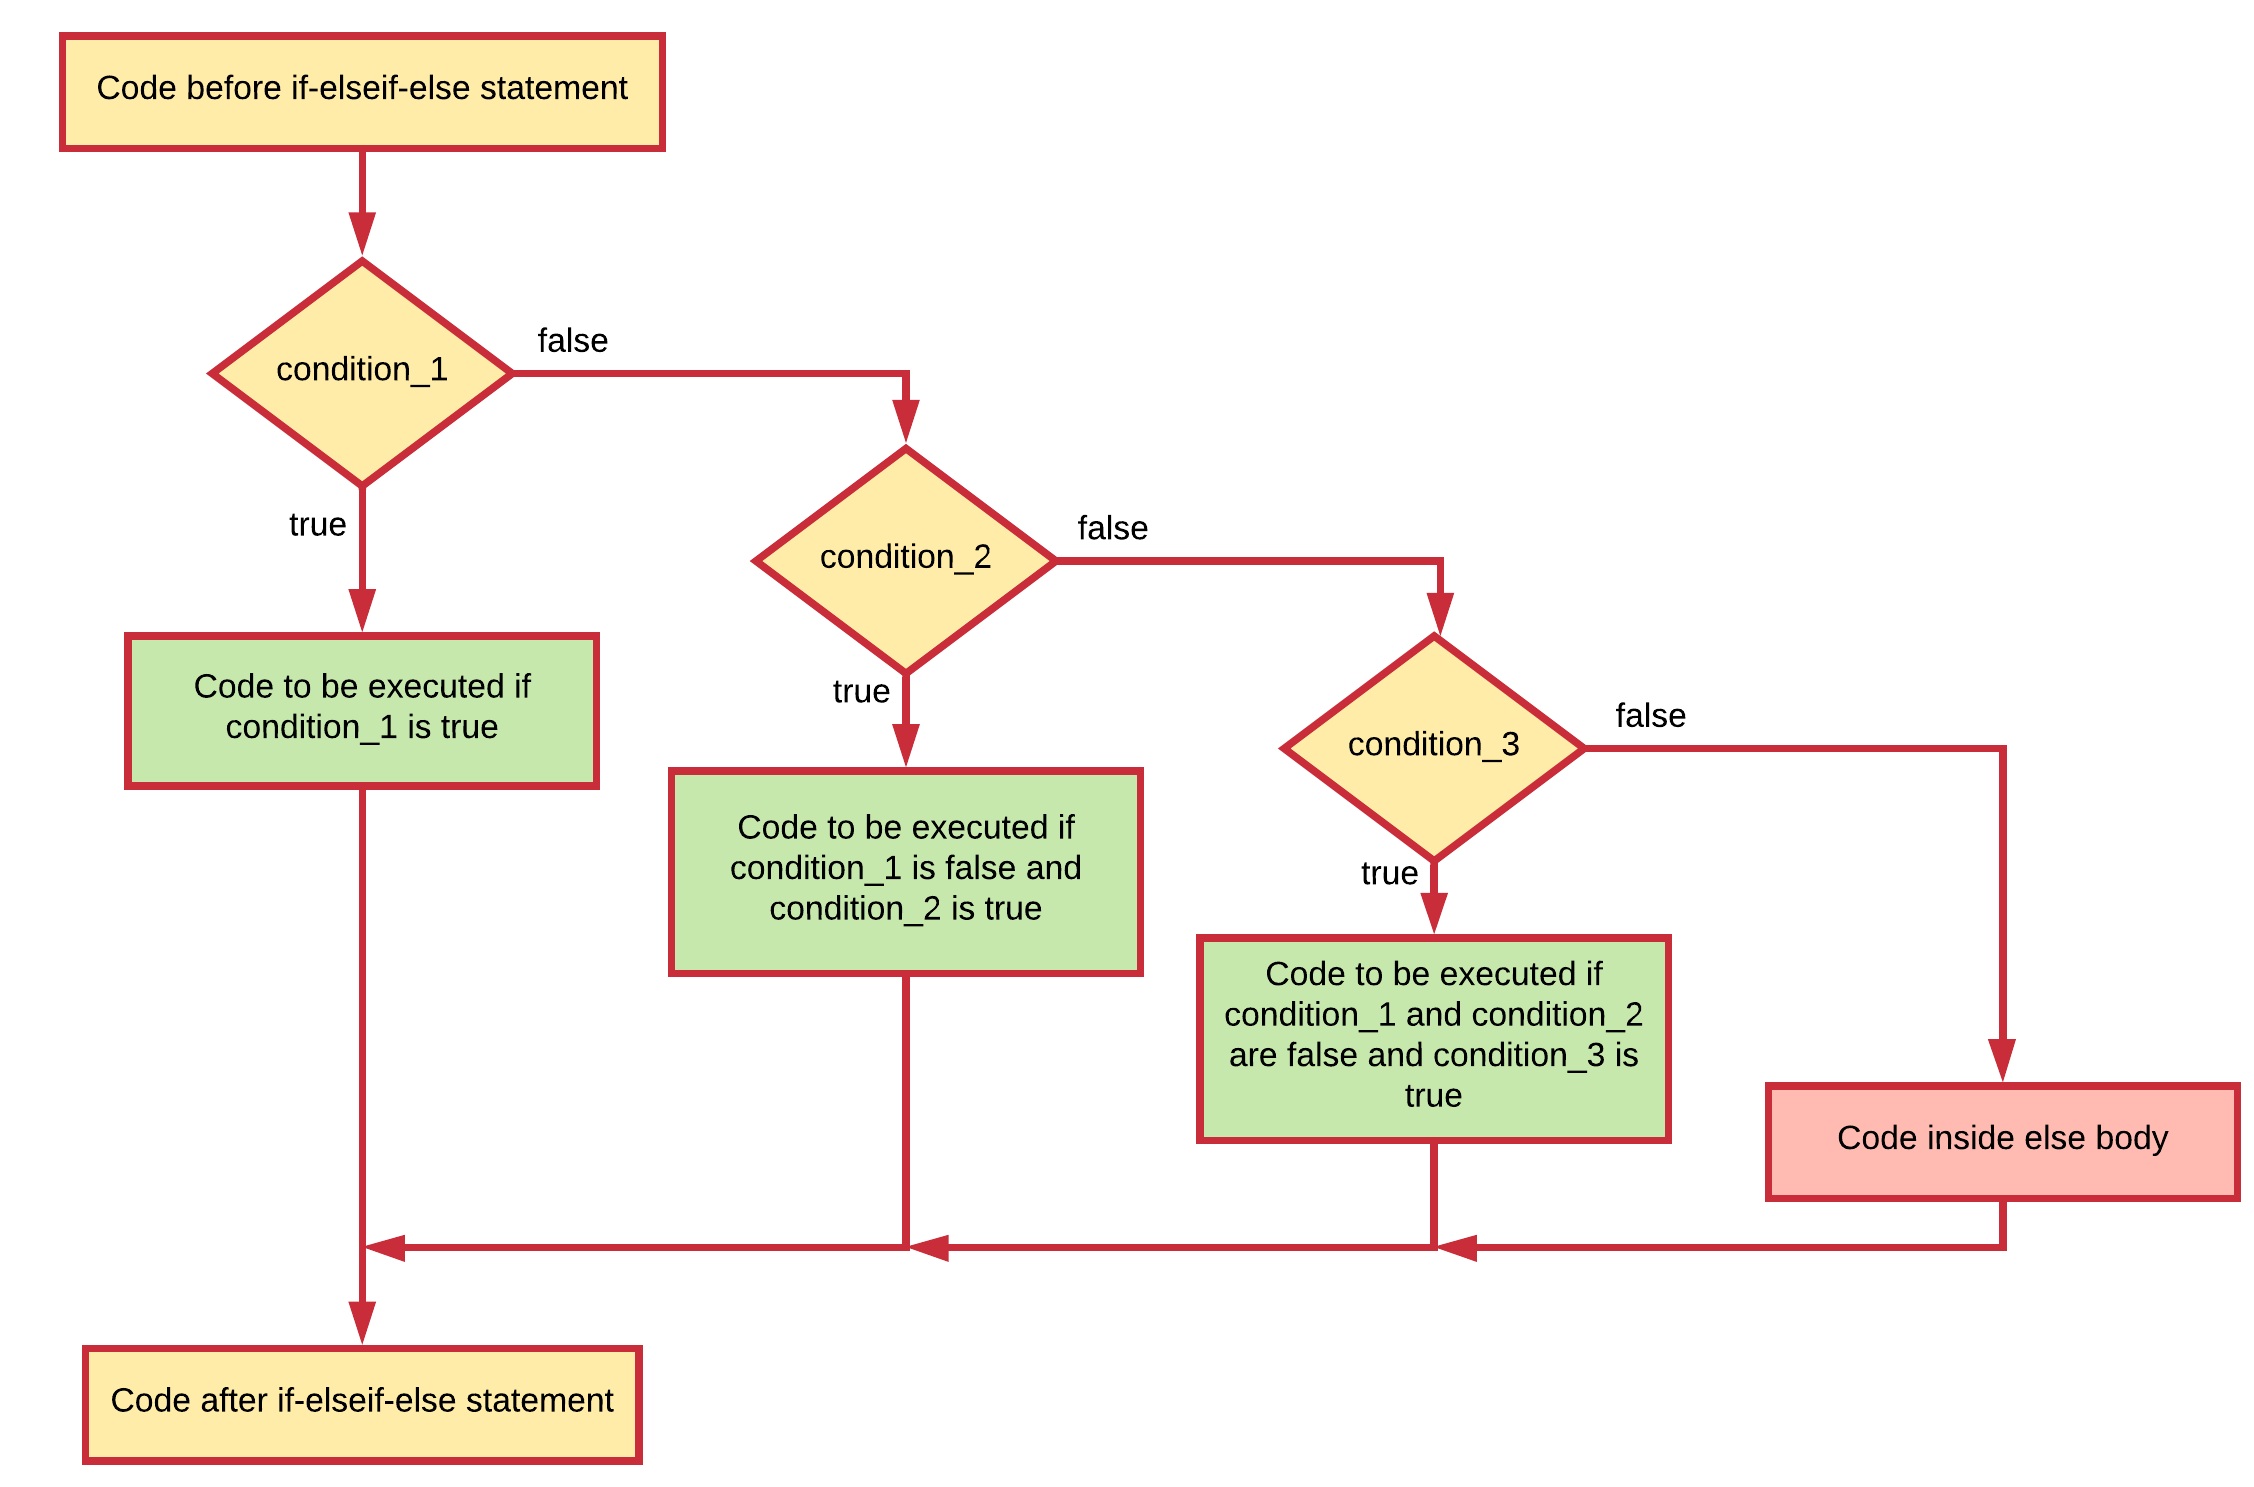
The if-elseif-else statement can be extended with as much elseif statements as required. Each elseif will need a new condition that needs to be checked. The conditions are checked from top to bottom and the first one that evaluates to true is executed, after which control jumps to the end of the if-elseif-else statement.
// Code before the if-elseif-else statement

if (condition_1)
{
  // Code to be executed if condition_1 is true
}
else if (condition_2)
{
  // Code to be executed if condition_1 is false and
  // condition_2 is true
}
else if (condition_3)
{
  // Code to be executed if condition_1 and
  // condition_2 are false and condition_3 is true
}
else
{
  // Code to be executed if all conditions evaluate to false
}

// Code after the if-elseif-else statement
Note that the else-clause is optional as it is with the if-else statement.
This can be visually represented using the next flowchart.

Conditional Operators
As long as the expression only produces a single resulting value (true or false), conditions can be combined using conditional operators. This is often necessary when creating more complex conditional expressions.
The next table provides an overview of the available conditional operators in C#.
| Operator | Description |
|---|---|
&& | AND |
|| | OR |
! | NOT |
These work as you know them from the Boolean algebra. The || (OR) operator will return true if either of the operands evaluate to true. The && (AND) operator will return true if both operands evaluate to true. A logical expression can be negated by placing the ! (NOT) operator in front of it.
Next is the truth table for all three conditional operators.
A | B | || | A && B | !A | !B |
|---|---|---|---|---|---|
false | false | false | false | true | true |
false | true | true | false | true | false |
true | false | true | false | false | true |
true | true | true | true | false | false |
In the table above, A and B are the left and right operands of the conditional operators. When writing a combined expression in code these operands are most often conditional expressions with each containing a comparison operation.
Take for example an expression that checks if number is within a range of [0, 100]. The condition could be coded as ( (number >= 0) && (number <= 100>) ).
The code example below checks if a person is a young adult based on his/her age (between 14 and 18 years of age).
int age = 16;
if ((age >= 14) && (age < 18))
{
  Console.WriteLine("You are a young adult");
}
While the inner parentheses are optional they do contribute to the readability of the expression.
⚖️ De Morgan's Laws
In some cases it can be useful to rewrite complex conditions using De Morgan's Laws https://en.wikipedia.org/wiki/De_Morgan%27s_laws. Do take note that shorter not always implies more readable or less complex.
Please be aware that every sub-part of a boolean expression must be a complete boolean expression. Thus if you want to know if A is either 10 or 20, you cannot state (A == 10 || 20). You need to express both operands as full conditional expressions: (A == 10 || A == 20).
🥱 Lazy evaluation
These operators exhibit "short-circuiting" behavior, which means that the second operand is evaluated only if needed. This is also called lazy evaluation. So for example in an OR statement, if the first operand is true, the outcome must also be true. For this reason the second operand is not checked anymore.
The Switch Statement
Take a look at some code that will tell the user what the day of the week is based on its integral value (1 to 7). First some example code is shown using a nested if-else statement.
int dayOfTheWeek = 3;       // Number from 1 to 7

if (dayOfTheWeek == 1)
{
  Console.WriteLine("Today it is Monday");
}
else if (dayOfTheWeek == 2)
{
  Console.WriteLine("Today it is Tuesday");
}
else if (dayOfTheWeek == 3)
{
  Console.WriteLine("Today it is Wednesday");
}
else if (dayOfTheWeek == 4)
{
  Console.WriteLine("Today it is Thursday");
}
else if (dayOfTheWeek == 5)
{
  Console.WriteLine("Today it is Friday");
}
else if (dayOfTheWeek == 6)
{
  Console.WriteLine("Today it is Saturday");
}
else if (dayOfTheWeek == 7)
{
  Console.WriteLine("Today it is Sunday");
}
else
{
  Console.WriteLine("Not a valid day of the week");
}
When checking a single variable for equality with an integral value using multiple if-else statements, it can be replaced with another structure called a switch structure. The template of the switch structure is shown below. Each case needs a single integral literal value to compare the variable against. If it matches (equals) than the code between the colon : and the break; statement is executed. The break is required for the switch to be stopped when a match is found.
☣️ Single integral literal value to compare
This is not the case anymore as of C# 7.0. However generally, this is the use case most often found. More info can be found at https://docs.microsoft.com/en-us/dotnet/csharp/language-reference/keywords/switch.
// Code before the switch statement

switch (variable) {
  case integral_literal_1:
    // Code to be executed
    break;
  case integral_literal_2:
    // Code to be executed
    break;
  case integral_literal_3:
    // Code to be executed
    break;
  // ...
  default:
    // Code to be executed in case no match found
    break;
}

// Code after the switch statement
The default case is optional. It's use is the same as the else-clause.
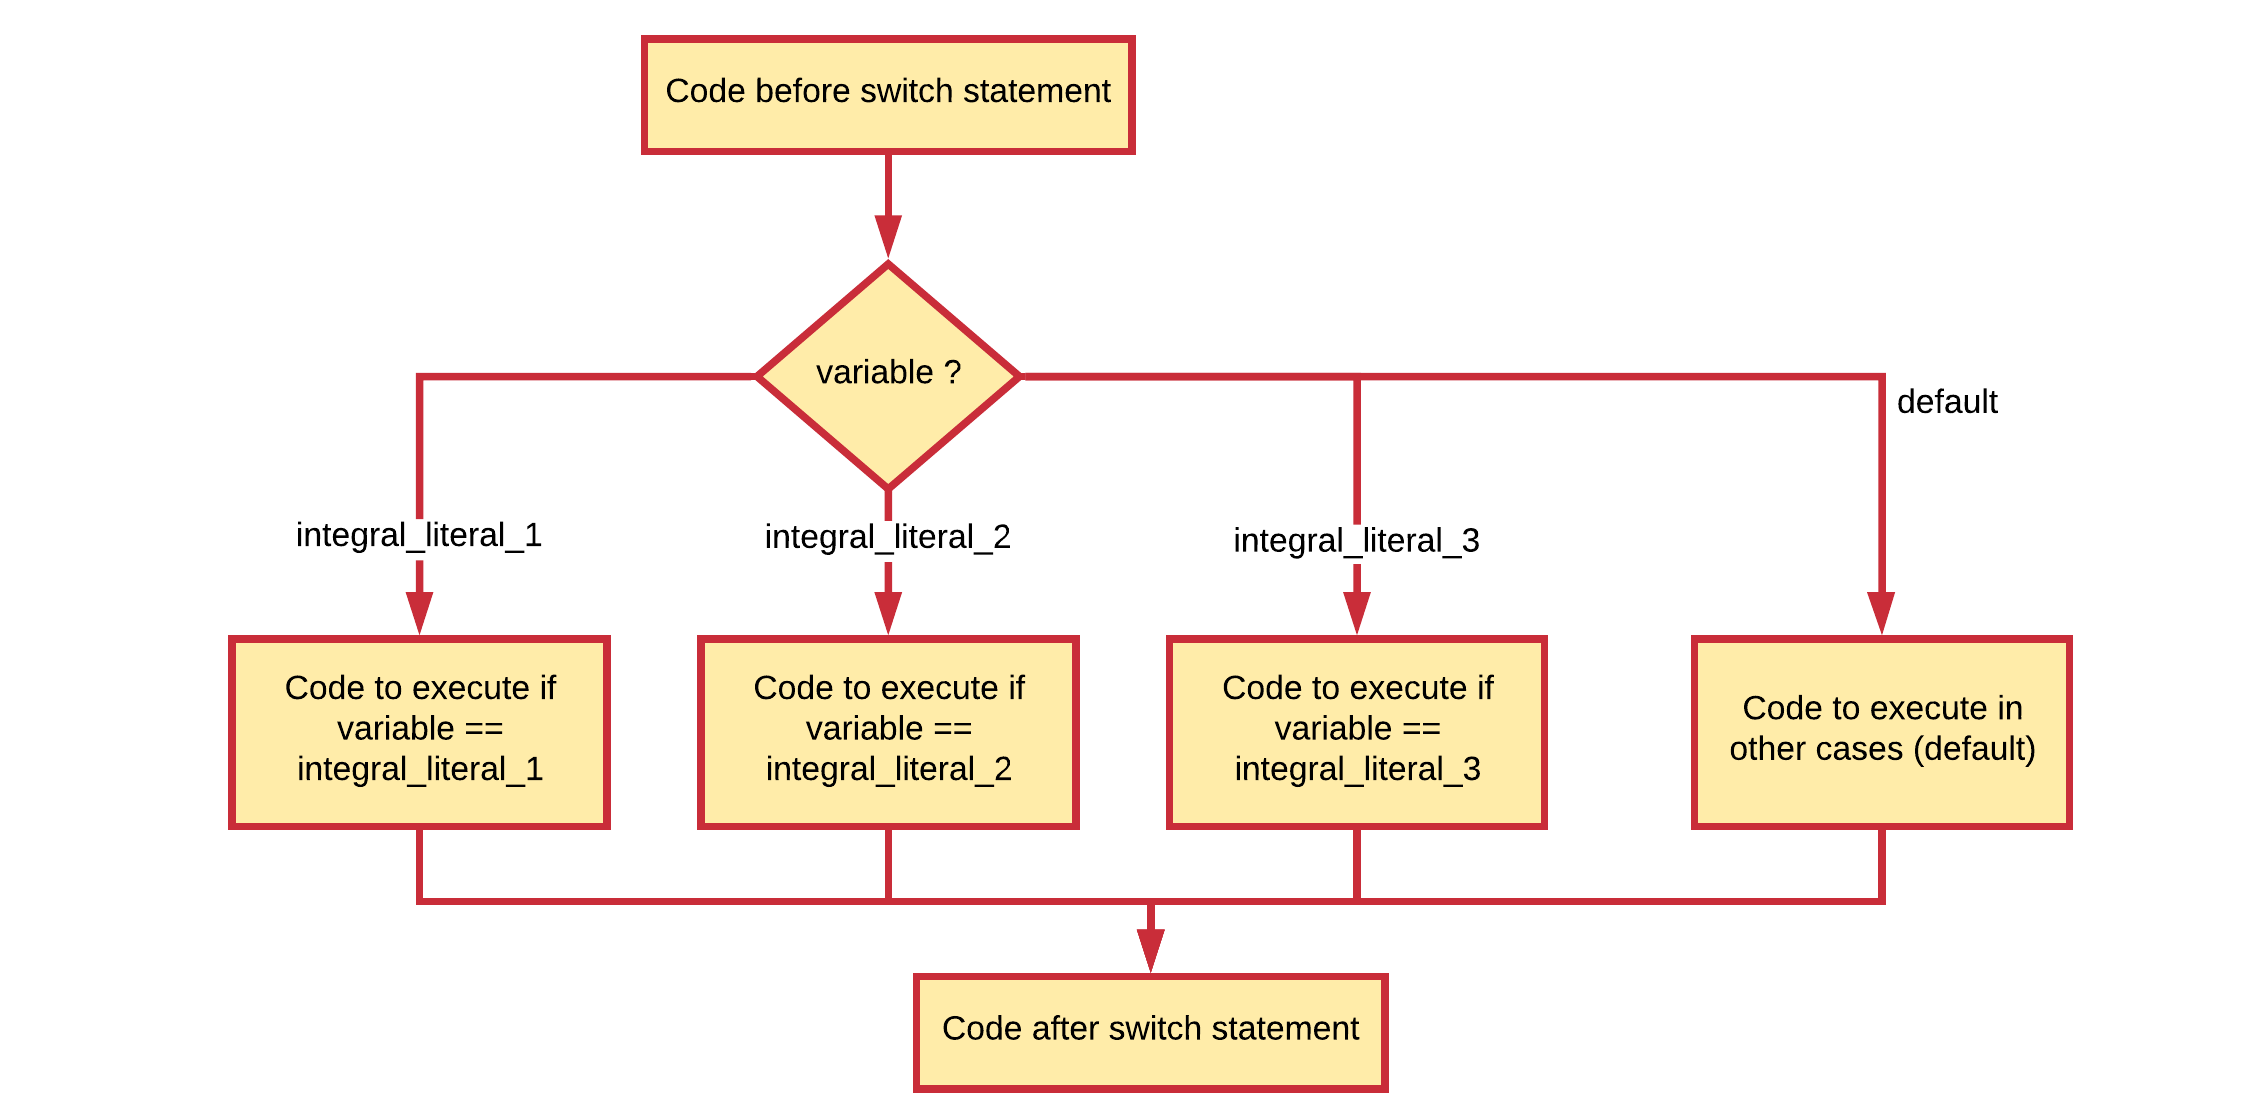
This can be visually represented using the next flowchart. Notice the difference with the if-elseif-else statement where each branch contains a new condition.

Note how the condition for each branch is an automatic equality check. It is not possible to use a switch statement to check for example if a variables value is bigger than a certain value.
Replacing the if-else structure of the day-of-the-week example with a switch statement results in the following code.
int dayOfTheWeek = 3;       // Number from 1 to 7

switch (dayOfTheWeek)
{
  case 1:
    Console.WriteLine("Today it is Monday");
    break;
  case 2:
    Console.WriteLine("Today it is Tuesday");
    break;
  case 3:
    Console.WriteLine("Today it is Wednesday");
    break;
  case 4:
    Console.WriteLine("Today it is Thursday");
    break;
  case 5:
    Console.WriteLine("Today it is Friday");
    break;
  case 6:
    Console.WriteLine("Today it is Saturday");
    break;
  case 7:
    Console.WriteLine("Today it is Sunday");
    break;
  default:
    Console.WriteLine("Not a valid day of the week");
    break;
}
Which to use when
As a starting programmer you may struggle a bit in the beginning on how to express more complex decision making structures. The choice is not always easy and depends a lot on the problem you are trying to solve. If you have more than 1 option in mind, consider using the one that is more clear and readable.
No general rule exists for when to use which construct. Some programmers don't like the switch statement. In most cases it is a case of preference.
